Welcome to Aurum PHP Engine
Aurum PHP Engine is a desktop low-code application that automatically generates PHP web applications directly from your MySQL database. No manual coding required — just connect to your database, configure your pages, and click Generate.
Whether you are a developer who wants to speed up repetitive CRUD work, or a non-developer who needs a functional web application fast, Aurum is built for you.
What You Get After Generating
- A fully functional PHP web application
- List, Add, Edit, Delete, and View pages for every table
- Login and authentication system (optional)
- Dashboard, Charts, and Reports
- Clean, ready-to-deploy PHP code that you own completely
What Aurum PHP Engine Does
Aurum reads your MySQL database structure and generates a complete PHP application based on your configuration. Here is the core workflow:
- Connect to your MySQL database
- Select or create a database
- Choose your tables and configure each page
- Set up field types, input controls, and relationships
- Configure security and login settings
- Click Generate — your PHP application is ready
The generated code is plain PHP — no framework lock-in, no dependencies you did not ask for. You can deploy it on any standard PHP hosting environment.
System Requirements
Before installing and running Aurum PHP Engine, make sure your PC meets the following specifications.
Minimum Requirements
| Component | Minimum |
|---|---|
| Operating System | Windows 10 (64-bit) |
| Processor | Intel Core i3 or equivalent |
| RAM | 4 GB |
| Storage | 500 MB free disk space |
| Display | 1280 x 720 resolution |
Recommended Requirements
| Component | Recommended |
|---|---|
| Operating System | Windows 10 / 11 (64-bit) |
| Processor | Intel Core i5 or equivalent |
| RAM | 8 GB or more |
| Storage | 1 GB free disk space |
| Display | 1920 x 1080 resolution |
⚠️ Aurum PHP Engine is a Windows desktop application. macOS and Linux are not currently supported.
Product Info & License
You can check your license status at any time by clicking Product Info in the top menu bar.
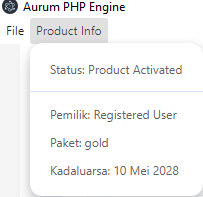
| Field | Description |
|---|---|
| Status | Shows whether your product is activated |
| Owner | The registered user name tied to this license |
| Package | Your current subscription plan (e.g. Gold) |
| Expiry | The license expiration date |
Some advanced features such as Calendar Page and Kanban View are marked as Gold Only. Visit https://aurumphp.my.id to upgrade or renew your license.
Database Connection
Aurum PHP Engine currently supports MySQL and MariaDB. For local development, we strongly recommend using XAMPP.
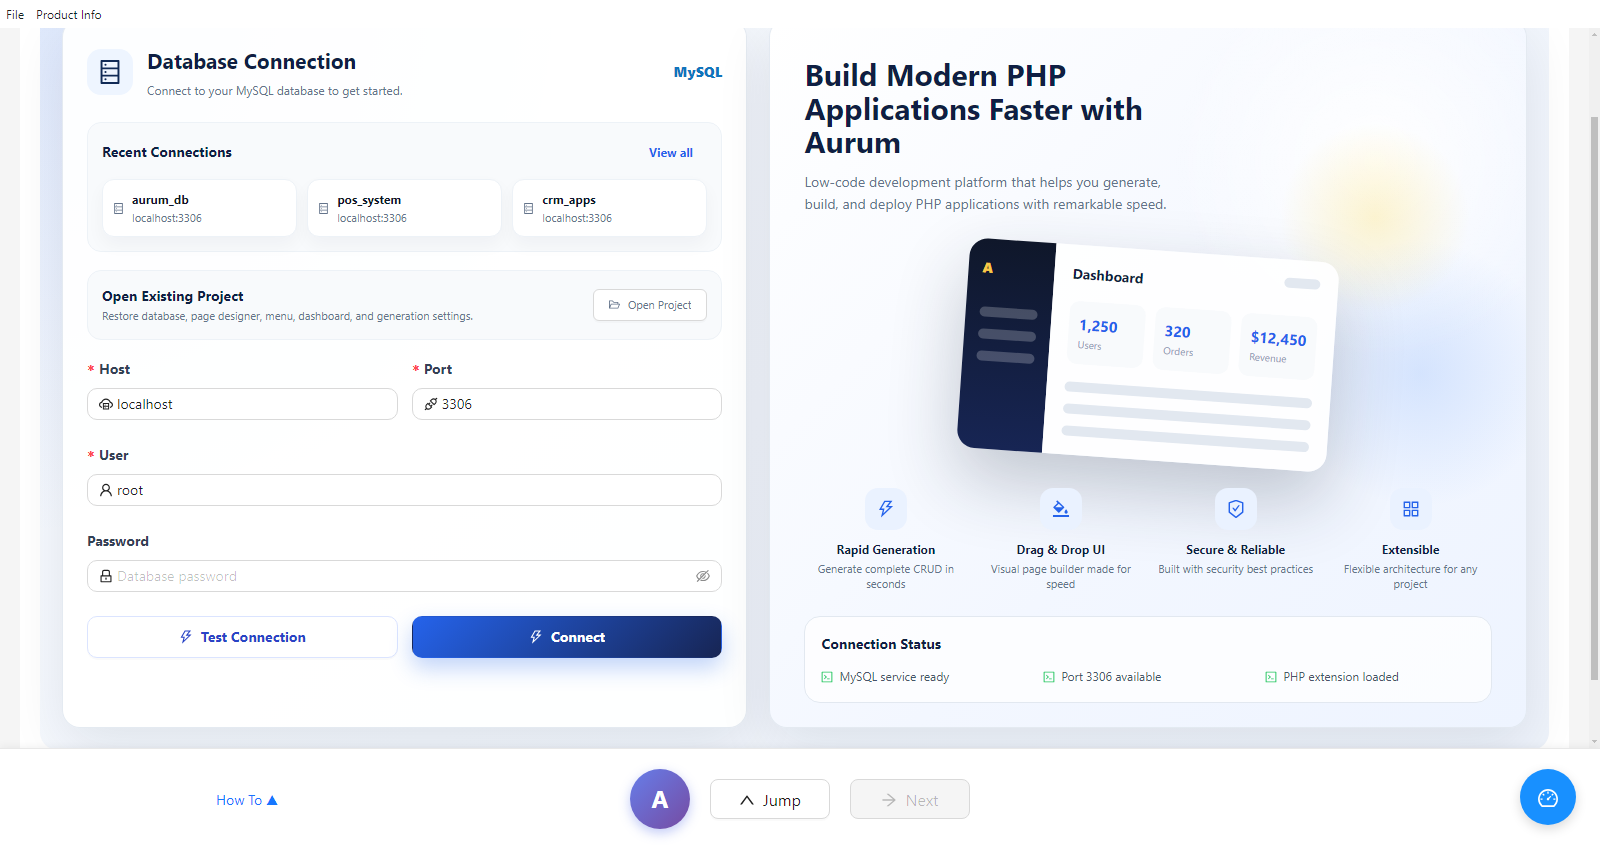
Before You Connect
Check the Connection Status panel — all three indicators must be active:
- MySQL service ready — MySQL is running and accessible
- Port 3306 available — the default MySQL port is open
- PHP extension loaded — PHP is properly installed and detected
Connection Form
| Field | Description | Default |
|---|---|---|
| Host | MySQL server address | localhost |
| Port | MySQL port number | 3306 |
| User | MySQL username | root |
| Password | MySQL password | leave blank if none |
Steps to Connect
- Open Aurum PHP Engine
- Fill in Host, Port, User, and Password
- Verify all three Connection Status indicators are active
- Click Test Connection to verify credentials
- Click Connect — the form locks and a database dropdown appears
- Select your database or click Create New
- Click Next to proceed to the main workspace
Recent Connections
Aurum displays previously used connections at the top — click any to auto-fill the form.
Open Existing Project
Click Open Project to restore a previously saved .arm project file — all settings restored at once.
Select or Create a Database
After a successful connection, the Select Database section appears at the bottom of the connection form.
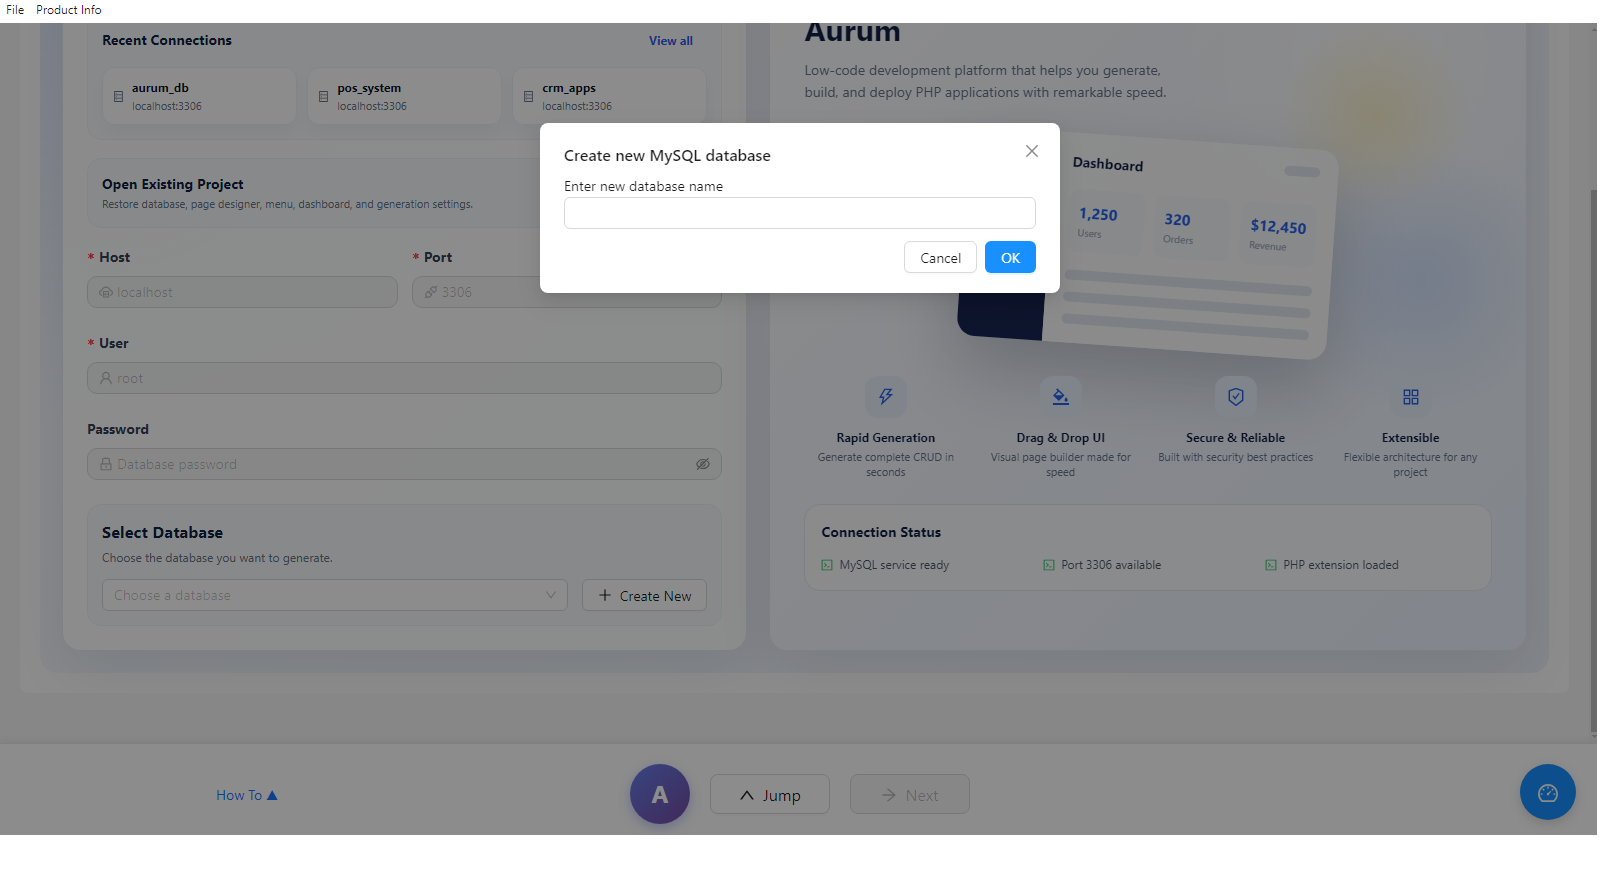
Select an Existing Database
Click the Choose a database dropdown and select the database you want to use.
Create a New Database
Click + Create New, enter a database name, and click OK. The database is created instantly in MySQL.
💡 Use lowercase letters and underscores for database names. Example: toko_online, inventory_db
Main Workspace & Creating a Table
Once connected, Aurum loads the main workspace. The sidebar shows the active database name — in this example office. Since the database is empty, it shows No tables in this database.

Click the Create Table icon in the sidebar to open the Create New Table dialog.
Table Name
Enter a name using lowercase letters and underscores — e.g. employees, product_list.
Auto-increment Field
Select which field will be AUTO_INCREMENT. If left as <None>, Aurum automatically adds an id field.
Defining Fields
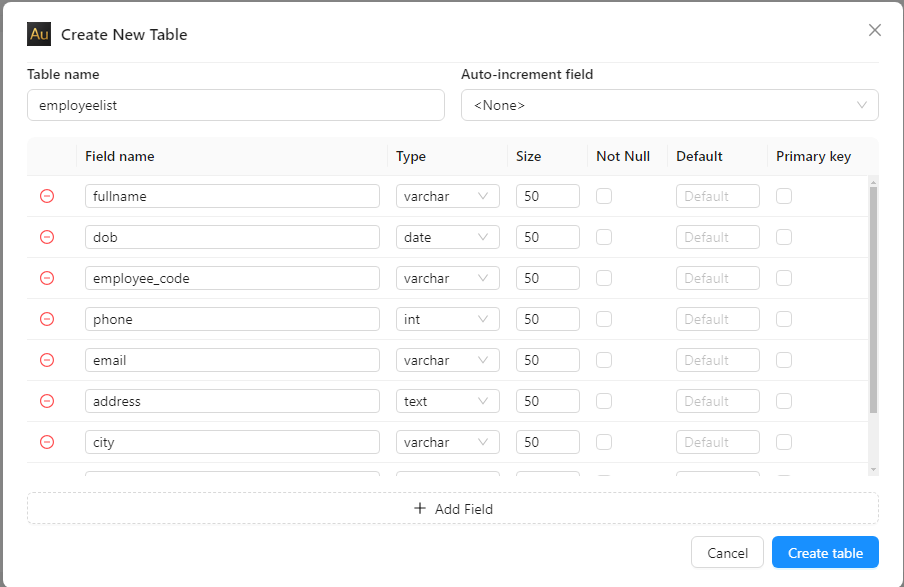
| Column | Description |
|---|---|
| Field name | The column name in the database |
| Type | Data type — varchar, int, decimal, date, text, etc. |
| Size | Maximum length. Required for varchar and char |
| Not Null | Check if the field must always have a value |
| Default | Default value when no data is provided |
| Primary Key | Check to set this field as the primary key |
💡 Hover over any type in the dropdown to see a tooltip explaining what that type is best used for.
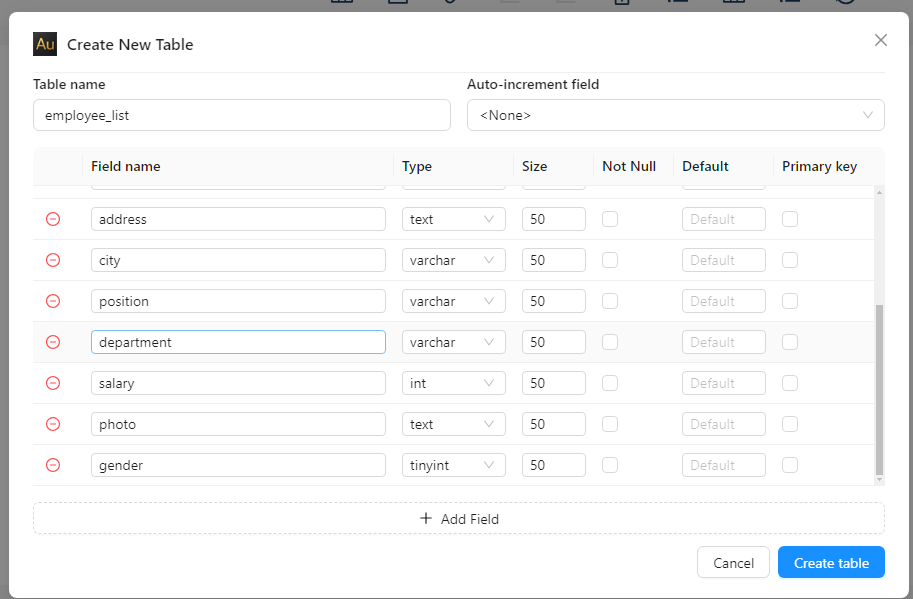
Important Notes on Field Types
Photo field — use text
Always set the photo field to text type. Aurum stores the image as a URL/path string which can exceed varchar(255).
Gender field — use tinyint
For fields with limited options (yes/no, male/female), use tinyint. You can configure it as a dropdown or radio button in Page Designer with labels like 0 = Male, 1 = Female.
Toolbar Overview
The toolbar at the top of the main workspace gives quick access to all major view modes and features.

| Icon | Name | Description |
|---|---|---|
| ⊞ | List View | Standard table list configuration — the default view |
| 📅 | Calendar View ⭐ | Calendar display for tables with date fields. Gold Only |
| 🔗 | Relation Table | Define visual relationships between master and detail tables |
| 📊 | Bar Chart | Add and configure a bar chart |
| 📈 | Line Chart | Add and configure a line chart |
| 📱 | Mobile View | Preview the page on a mobile screen |
| ☰ | Kanban View ⭐ | Kanban board layout. Gold Only |
| ⊞ | Grid View | Spreadsheet-style grid layout |
| ≡ | Menu Settings | Configure the navigation menu |
| ↺ | Refresh | Reload and sync the table structure from the database |
Table Relationships
The Add Relationship feature lets you visually connect a master table to a detail table. When a user clicks Add New on a master record, the detail form opens with the linked field already pre-filled automatically.
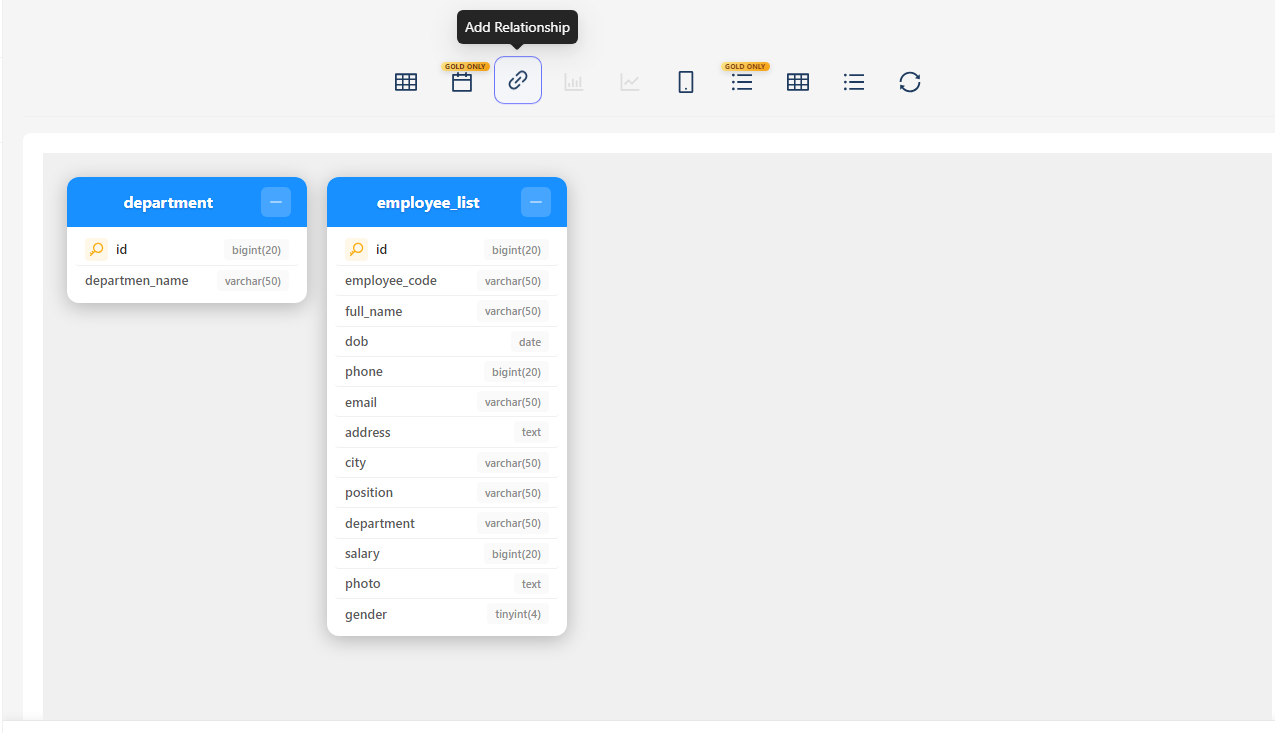
Setting Up the Department Table
Create a new table called department with fields: id (bigint, primary key) and departmen_name (varchar 50).
Creating the Relationship
- Click the chain link icon in the toolbar to open the Relation canvas
- Drag from departmen_name in the department card to department in the employee_list card
- Release — the Table Link Properties dialog opens automatically
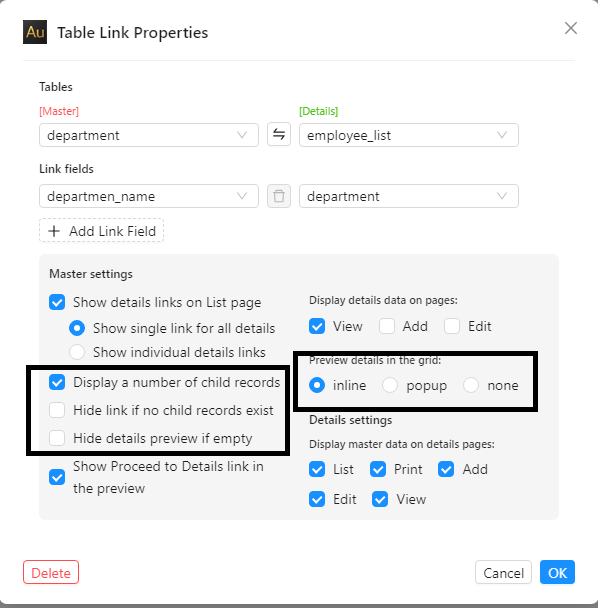
Table Link Properties
| Setting | Description |
|---|---|
| Master | department — the parent table |
| Details | employee_list — the child table |
| Master field | departmen_name |
| Detail field | department |
Preview Details in the Grid
| Option | Description |
|---|---|
| inline | Child records expand directly below the master row — no page change |
| popup | Child records appear in a popup overlay |
| none | No preview — navigate to a separate detail page |
Display a Number of Child Records
When enabled, the master list page shows a count badge next to each row — for example, how many employees belong to each department. This gives users an instant overview without opening the detail page.
Page Settings
Controls which pages and features will be generated for each table.
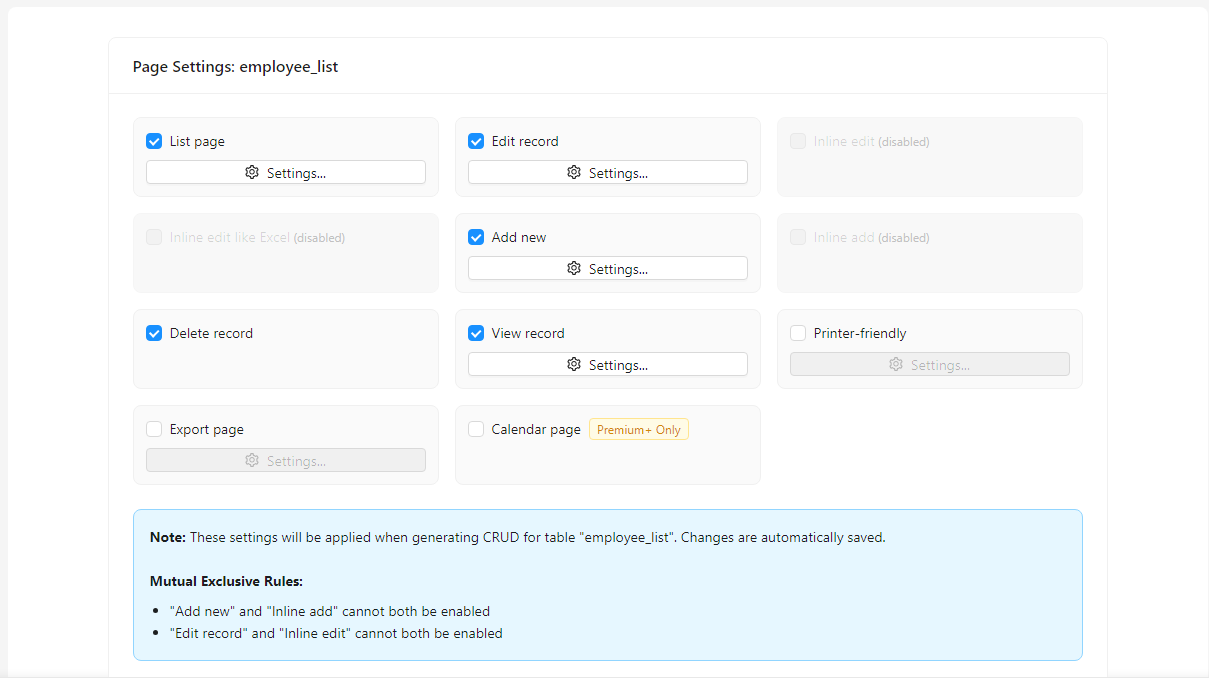
| Page | Description |
|---|---|
| List page | Main data grid showing all records |
| Edit record | Form page for editing an existing record |
| Inline edit | Edit directly inside the list grid row |
| Inline edit like Excel | Spreadsheet-style inline editing |
| Add new | Form page for adding a new record |
| Inline add | Add a record at the bottom of the list grid |
| Delete record | Adds a delete button to each row |
| View record | Read-only detail page for a single record |
| Printer-friendly | Print-optimized version of the page |
| Export page | Export data to Excel or CSV |
| Calendar page ⭐ | Calendar layout. Requires a date field. Premium+ Only |
⚠️ Mutual Exclusive Rules: "Add new" and "Inline add" cannot both be enabled. "Edit record" and "Inline edit" cannot both be enabled.
💡 All changes in Page Settings are automatically saved.
Field Configuration
Controls which fields appear on each page of the generated application.
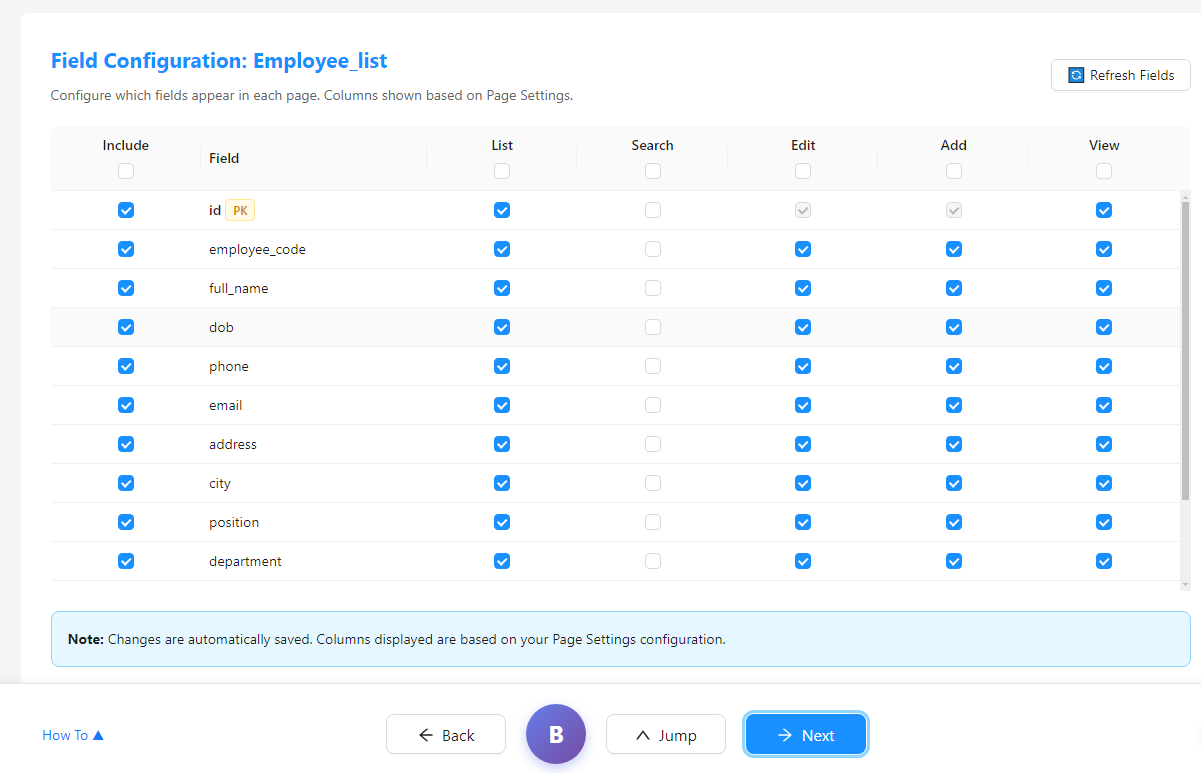
| Column | Description |
|---|---|
| Include | Master toggle — uncheck to exclude this field from all pages |
| Field | Database column name. Fields tagged PK are primary keys |
| List | Show this field as a column in the list page |
| Search | Make this field searchable on the list page |
| Edit | Show this field in the Edit form |
| Add | Show this field in the Add form |
| View | Show this field on the View detail page |
Simply check or uncheck any checkbox to show or hide a field per page. The checkbox in each column header selects/deselects all fields in that column at once.
Click Refresh Fields to re-sync the field list after making structural changes to the database table.
Security Settings
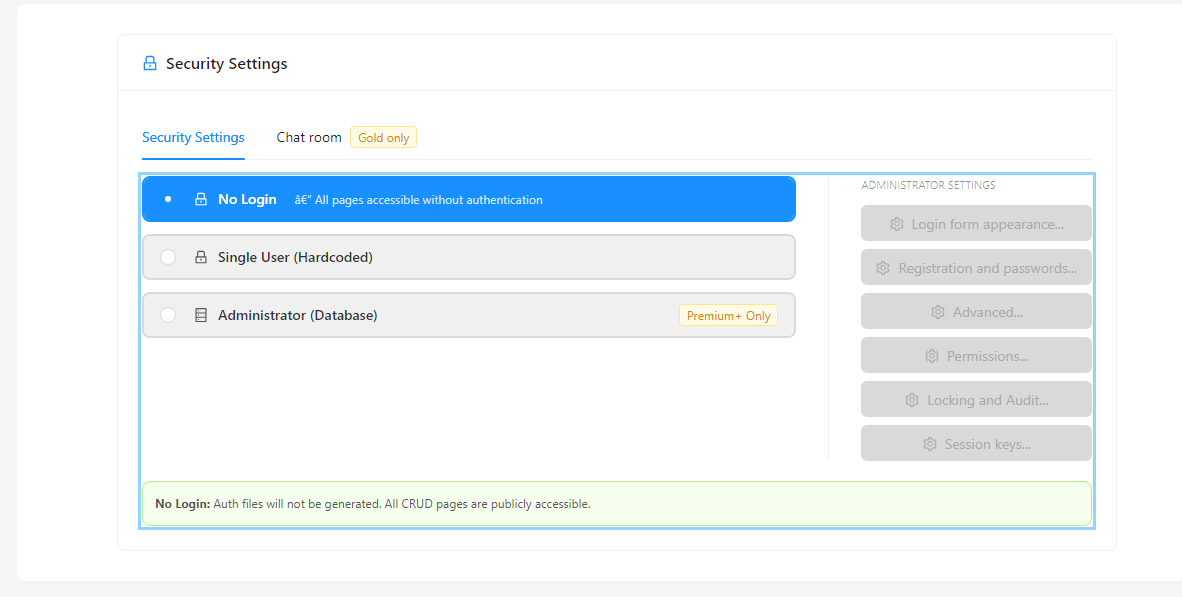
| Option | Description |
|---|---|
| No Login | All pages publicly accessible. No login page generated |
| Single User (Hardcoded) | Single username/password stored in code |
| Administrator (Database) | Full database-driven authentication. Premium+ Only |
💡 For this tutorial, select No Login. Auth files will not be generated. All CRUD pages are publicly accessible. You can switch to a login method later.
Administrator Settings Panel
- Login form appearance — customize the login page look
- Registration and passwords — configure user registration rules
- Permissions — set page-level access control per user role
- Locking and Audit — account locking and activity logging
- Session keys — configure session security
Template Design
Choose a visual template for your generated application. Aurum provides several ready-made CSS templates.
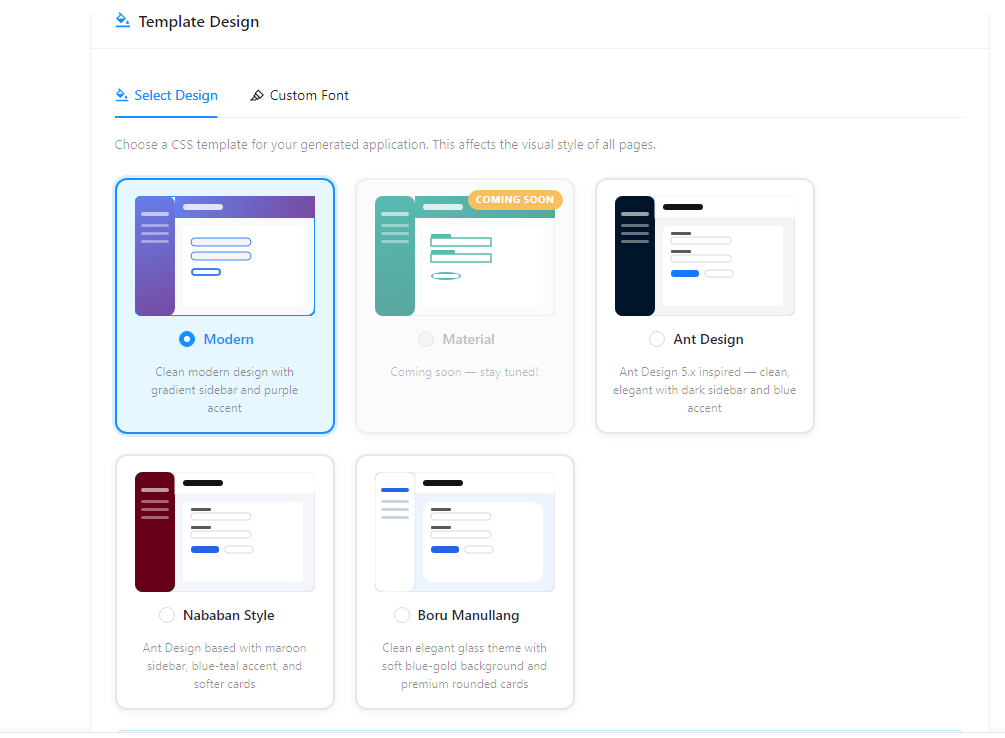
| Template | Description |
|---|---|
| Modern ✅ | Clean modern design with gradient sidebar and purple accent. Default |
| Material | Coming soon |
| Ant Design | Ant Design 5.x inspired — dark sidebar and blue accent |
| Nababan Style | Maroon sidebar, blue-teal accent, softer cards |
| Boru Manullang | Glass theme with soft blue-gold background and rounded cards |
Custom Font
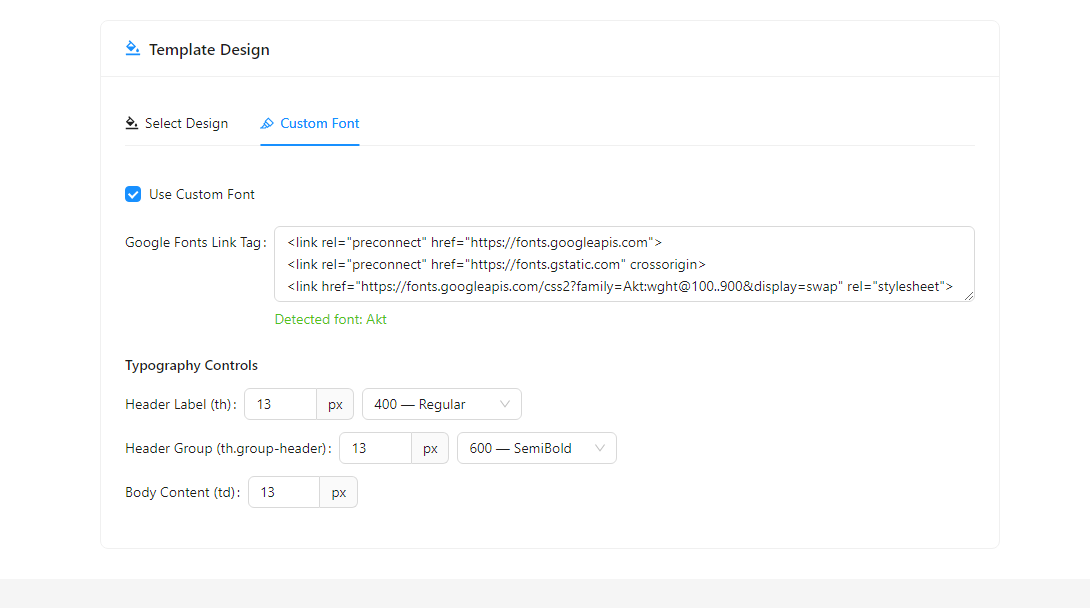
Use any font from Google Fonts by pasting the embed code into the Google Fonts Link Tag field:
<link rel="preconnect" href="https://fonts.googleapis.com">
<link rel="preconnect" href="https://fonts.gstatic.com" crossorigin>
<link href="https://fonts.googleapis.com/css2?family=Akt:wght@100..900&display=swap" rel="stylesheet">
Aurum detects the font name automatically — e.g. Detected font: Akt.
Typography Controls
| Element | Description |
|---|---|
| Header Label (th) | Font size and weight for table column headers. Default: 13px, 400 Regular |
| Header Group (th.group-header) | Font size and weight for grouped headers. Default: 13px, 600 SemiBold |
| Body Content (td) | Font size for table body content. Default: 13px |
Page Designer — List Tab
Page Designer controls the layout and field order for each page. Everything configured here is directly reflected in the generated PHP code.
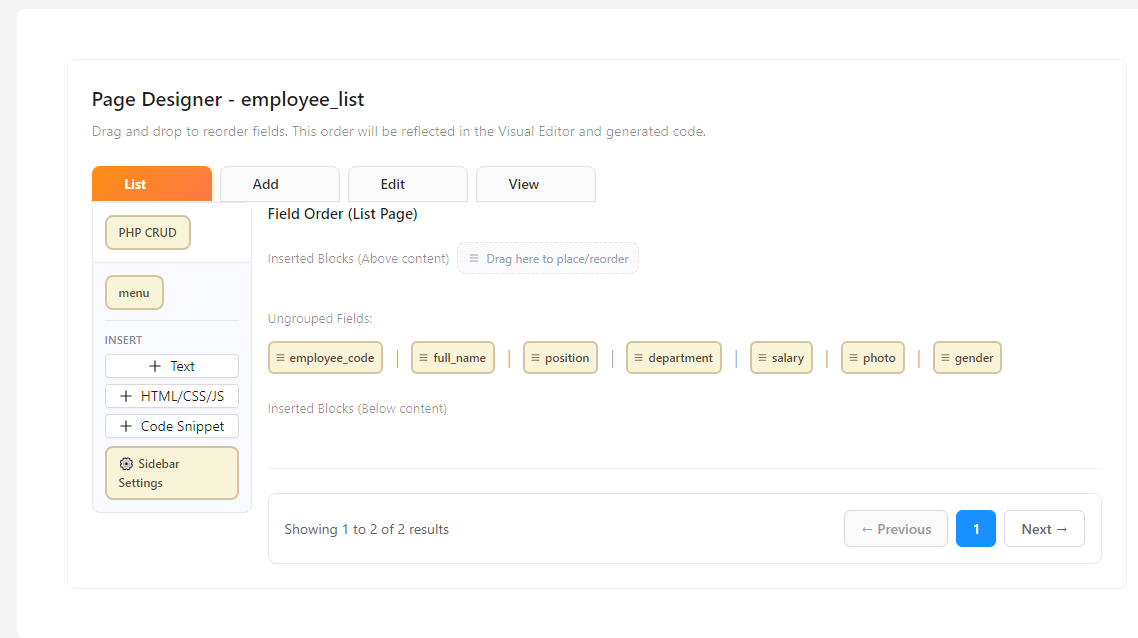
The designer has four tabs — List, Add, Edit, and View. Each field is displayed as a draggable chip. Drag and drop to reorder columns — the order you set is the exact column order in the generated page.
List Properties Panel
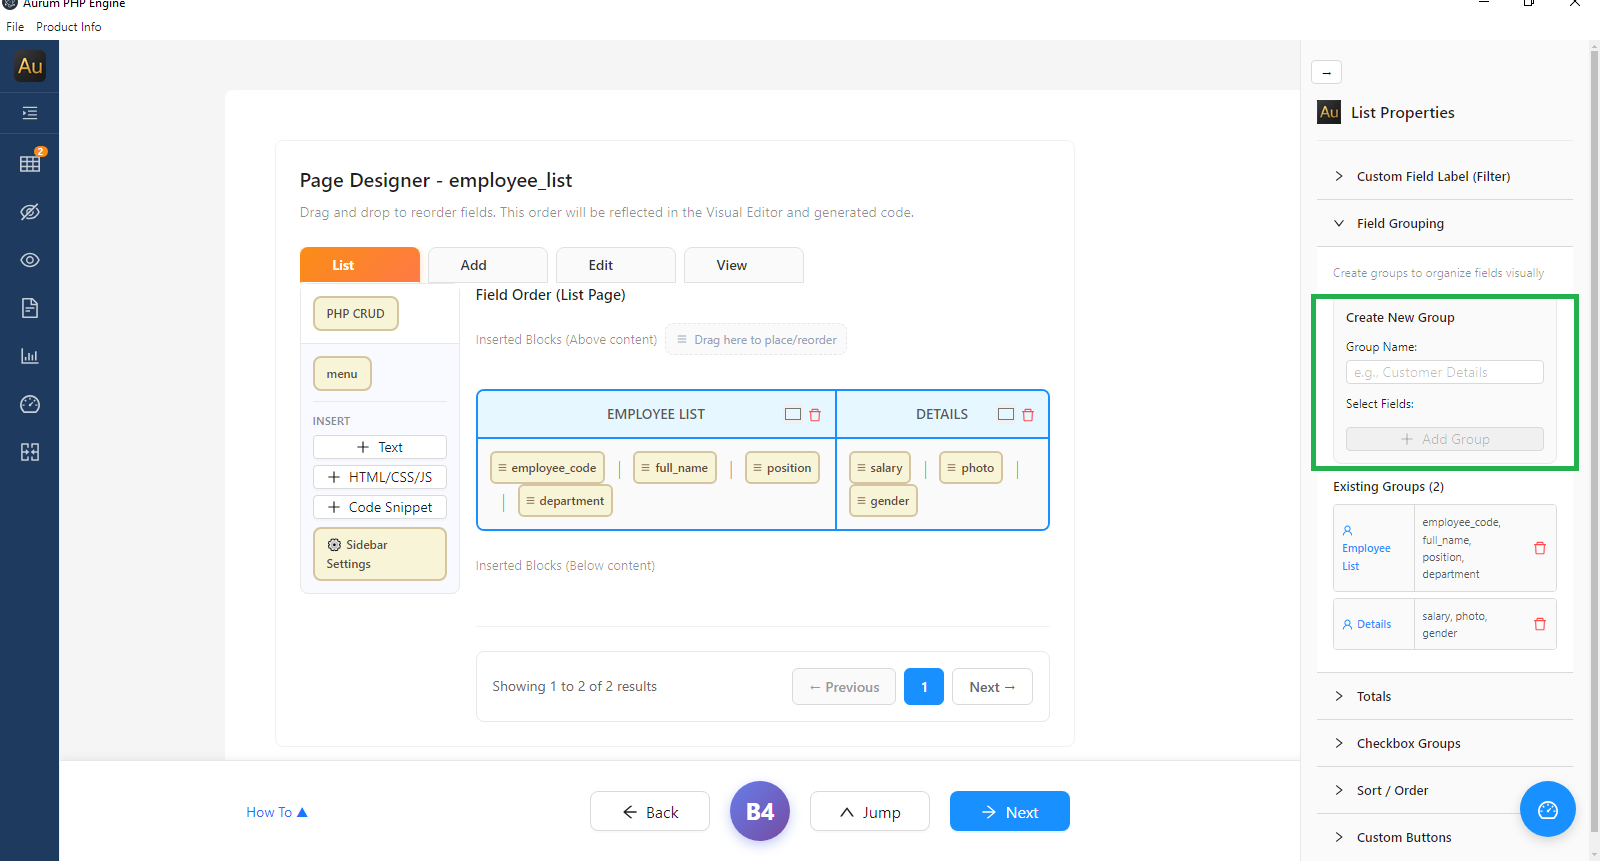
On the right side is the collapsible List Properties panel. Expand Field Grouping to organize columns under shared group headers.
In the example above, two groups are defined:
| Group | Fields |
|---|---|
| Employee List | employee_code, full_name, position, department |
| Details | salary, photo, gender |
Other sections in the panel: Custom Field Label, Totals, Checkbox Groups, Sort / Order, Custom Buttons.
Menu Settings
Organize the sidebar navigation into structured groups, customize display names, and add icons to each menu item.
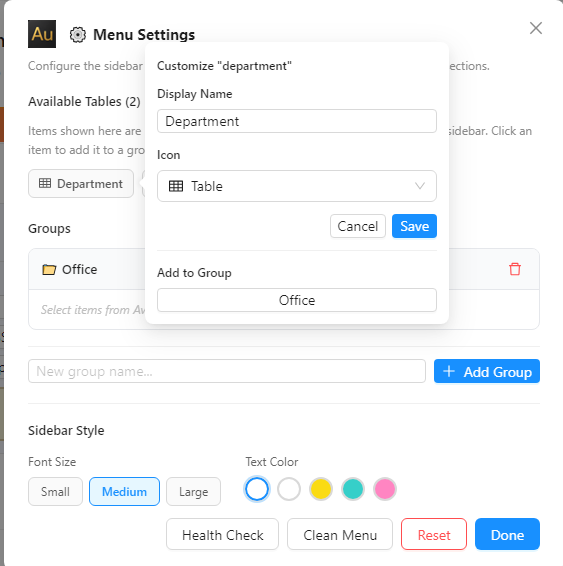
Click any table chip to customize it — set a Display Name, choose an Icon, and assign it to a Group.
Creating Menu Groups
- Type a group name in the New group name... field
- Click + Add Group
- Assign table items to the group using Add to Group
Sidebar Style
Choose Font Size (Small / Medium / Large) and Text Color from preset options.
Page Designer — Add Tab & Behavior
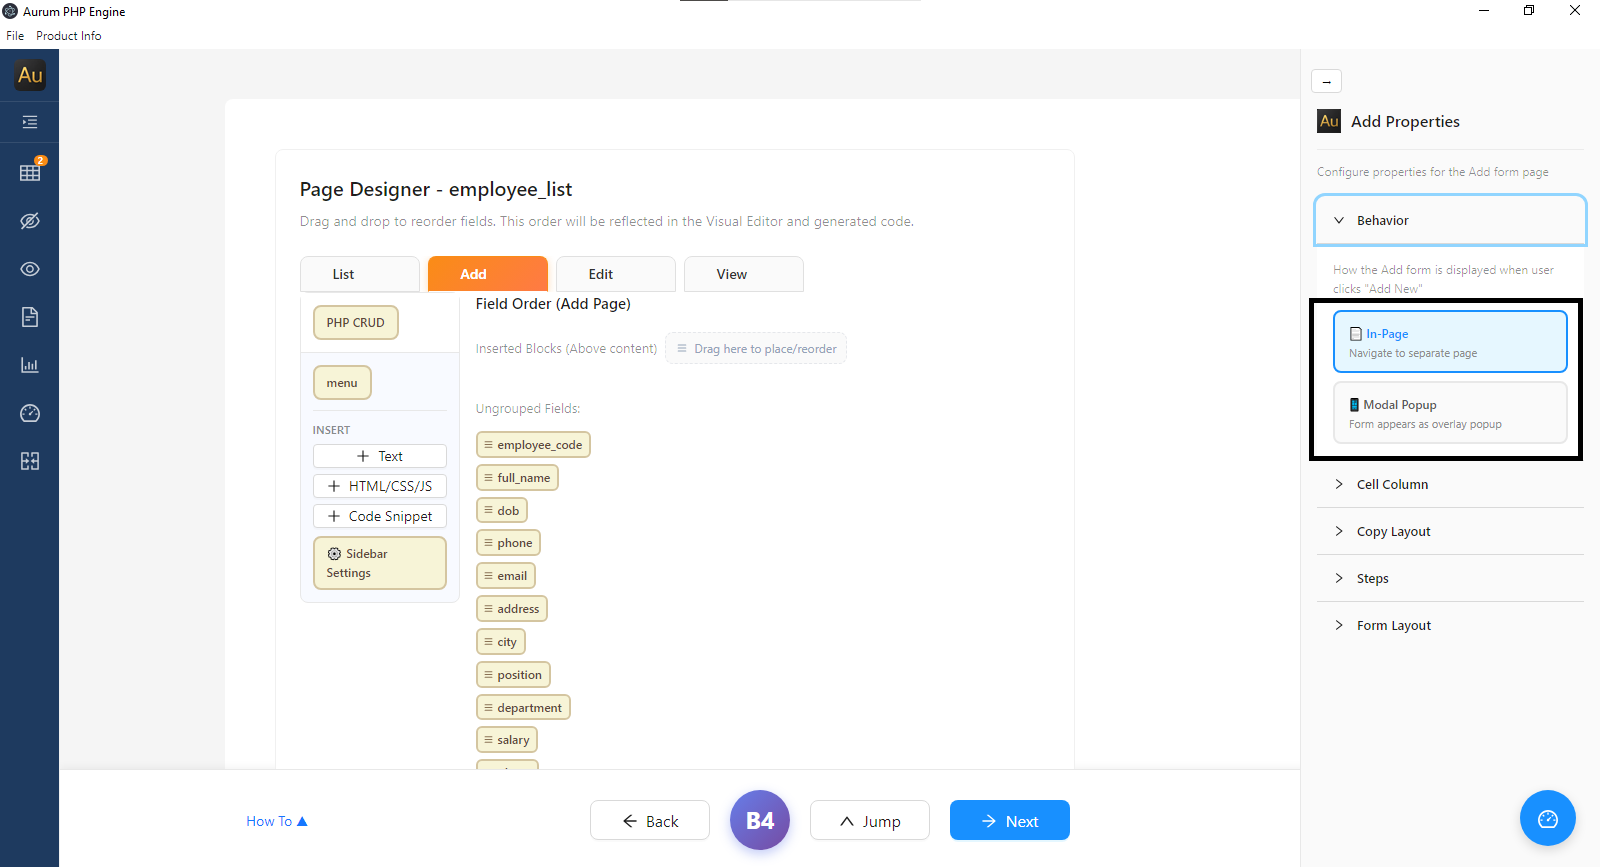
Click the Add tab to configure the form shown when a user clicks Add New. Drag field chips to reorder them.
Behavior
| Option | Description |
|---|---|
| In-Page | Navigates to a separate dedicated page for the Add form |
| Modal Popup | Form appears as an overlay popup — no page navigation required |
Choose Modal Popup for a more modern and seamless user experience.
Cell Column
Control how many columns the form fields are arranged in — creating a multi-column layout so fields sit side by side.
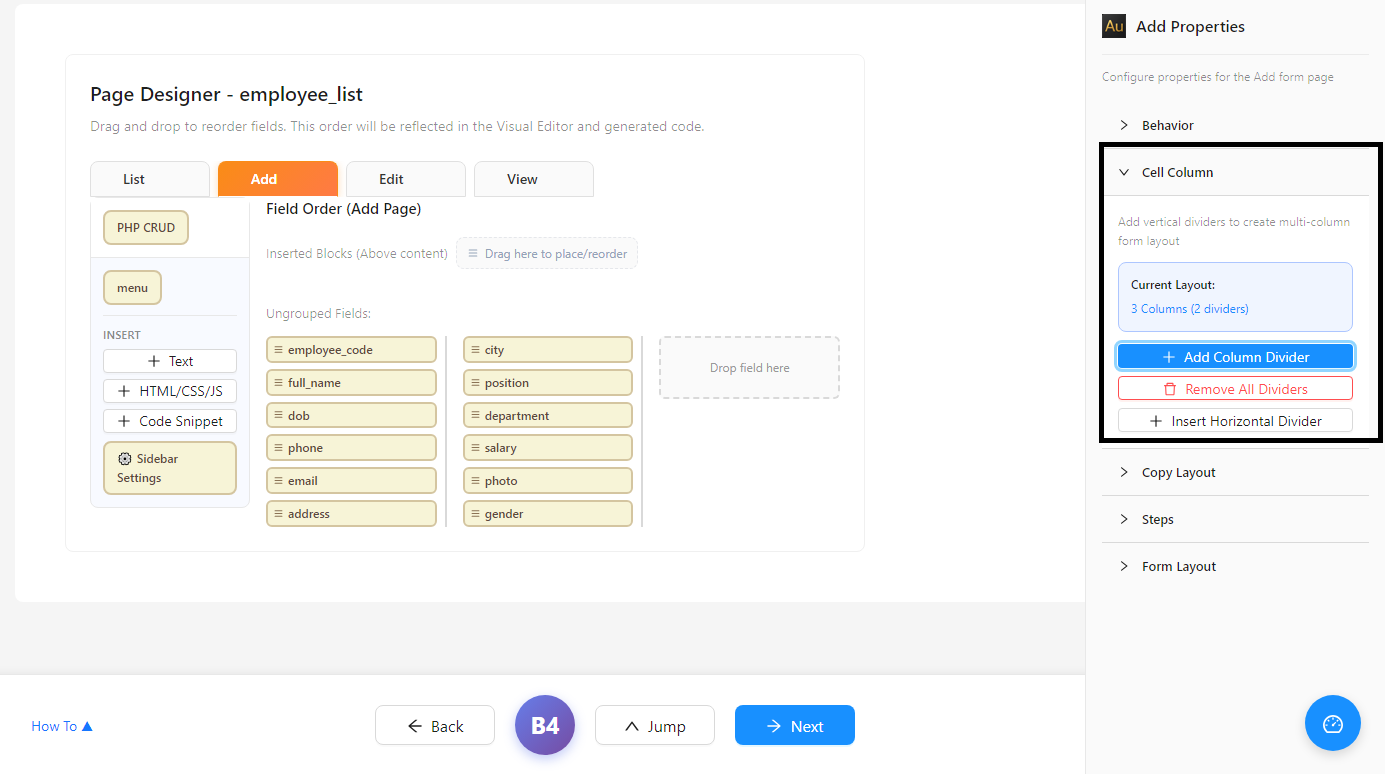
The Current Layout indicator shows the active configuration — e.g. 3 Columns (2 dividers).
| Button | Description |
|---|---|
| + Add Column Divider | Adds a vertical divider — increases column count by one |
| Remove All Dividers | Reverts to single column layout |
| + Insert Horizontal Divider | Inserts a horizontal separator line between fields |
💡 Drag field chips into the desired column area. The dashed Drop field here zone indicates an available column slot.
Copy Layout
Once you have arranged the layout in the Add tab, copy it instantly to Edit and View — without repeating the configuration manually.
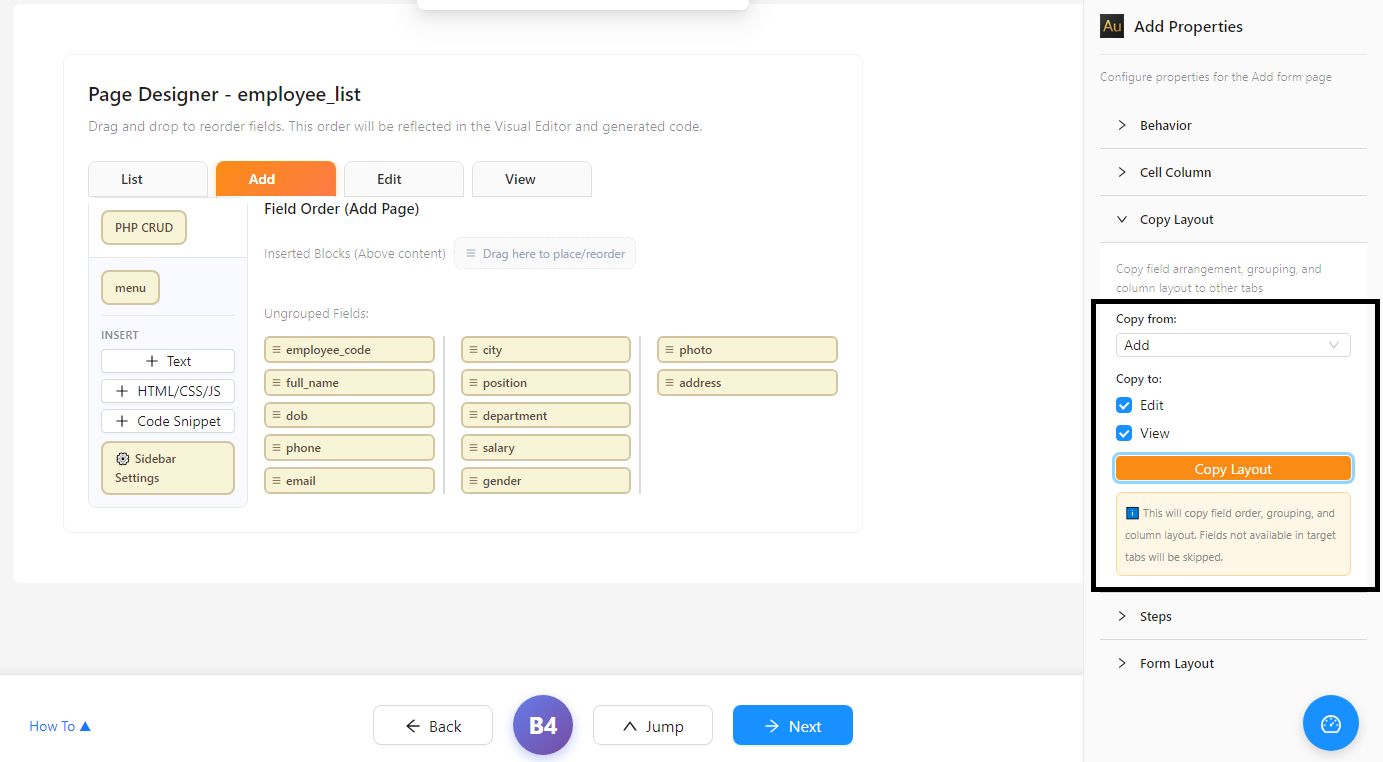
| Option | Description |
|---|---|
| Copy from | Select the source tab — e.g. Add |
| Copy to | Check target tabs — Edit and/or View |
| Copy Layout button | Executes the copy — field order, grouping, and column layout transferred instantly |
💡 Fields not available in the target tabs will be skipped automatically.
Field Settings
Double-click any field chip to open its individual Field Settings. The selected field is highlighted with an orange border.
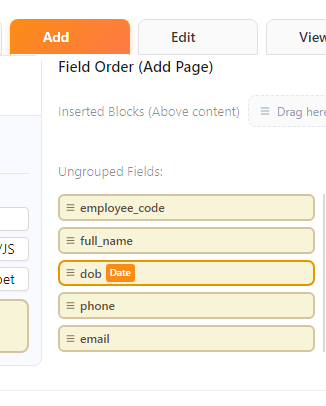
In Placeholder and Label, enter a user-friendly label — e.g. field dob → label Date of Birth.
Number Field — Salary
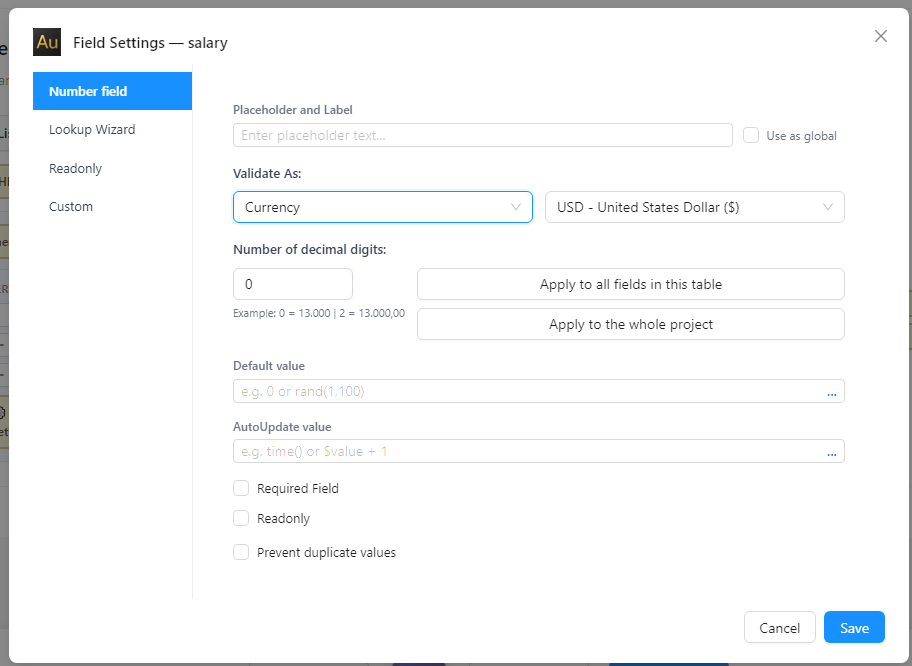
Set Validate As to Currency and choose the currency type (e.g. USD). Set decimal digits: 0 = 13.000, 2 = 13.000,00.
Use Apply to all fields in this table or Apply to the whole project to apply the format globally.
Checkbox — Gender
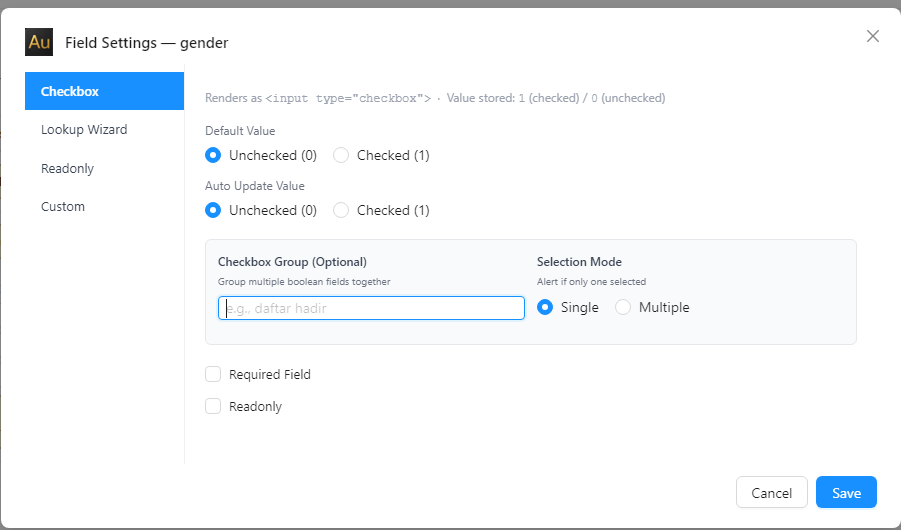
For tinyint fields, Aurum defaults to Checkbox mode. Stores 1 (checked) or 0 (unchecked) — maps to Male/Female.
Lookup Wizard — Gender (Alternative)
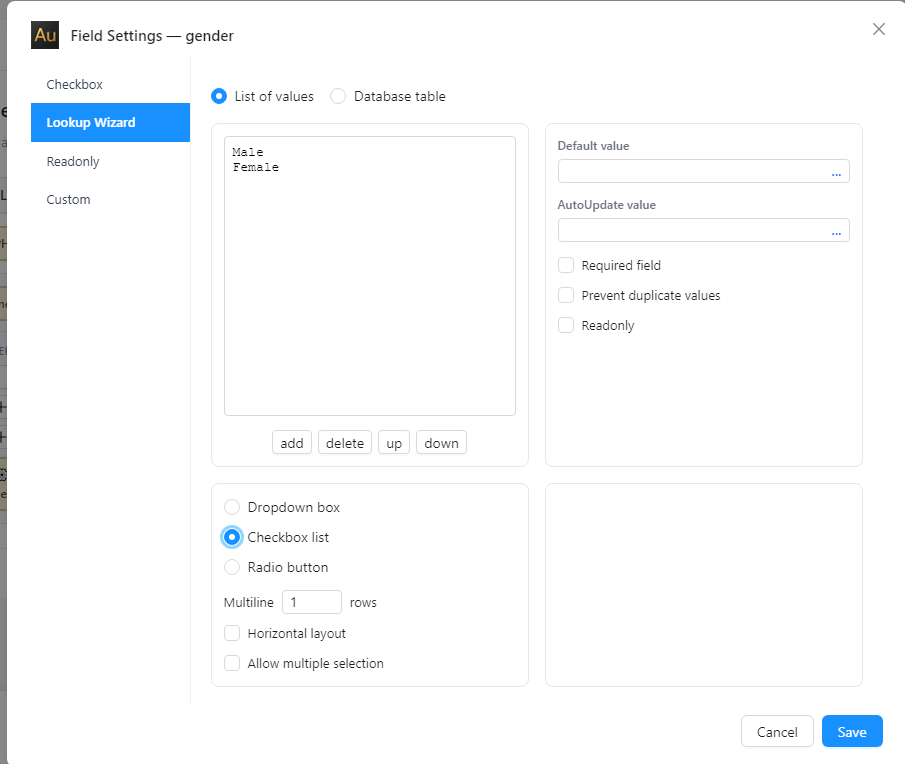
Use Lookup Wizard → List of values for a more flexible selection UI. Type each option on a new line:
Male
Female
Choose display mode: Dropdown box, Checkbox list, or Radio button. For gender, Radio button is most intuitive.
Single Image — Photo
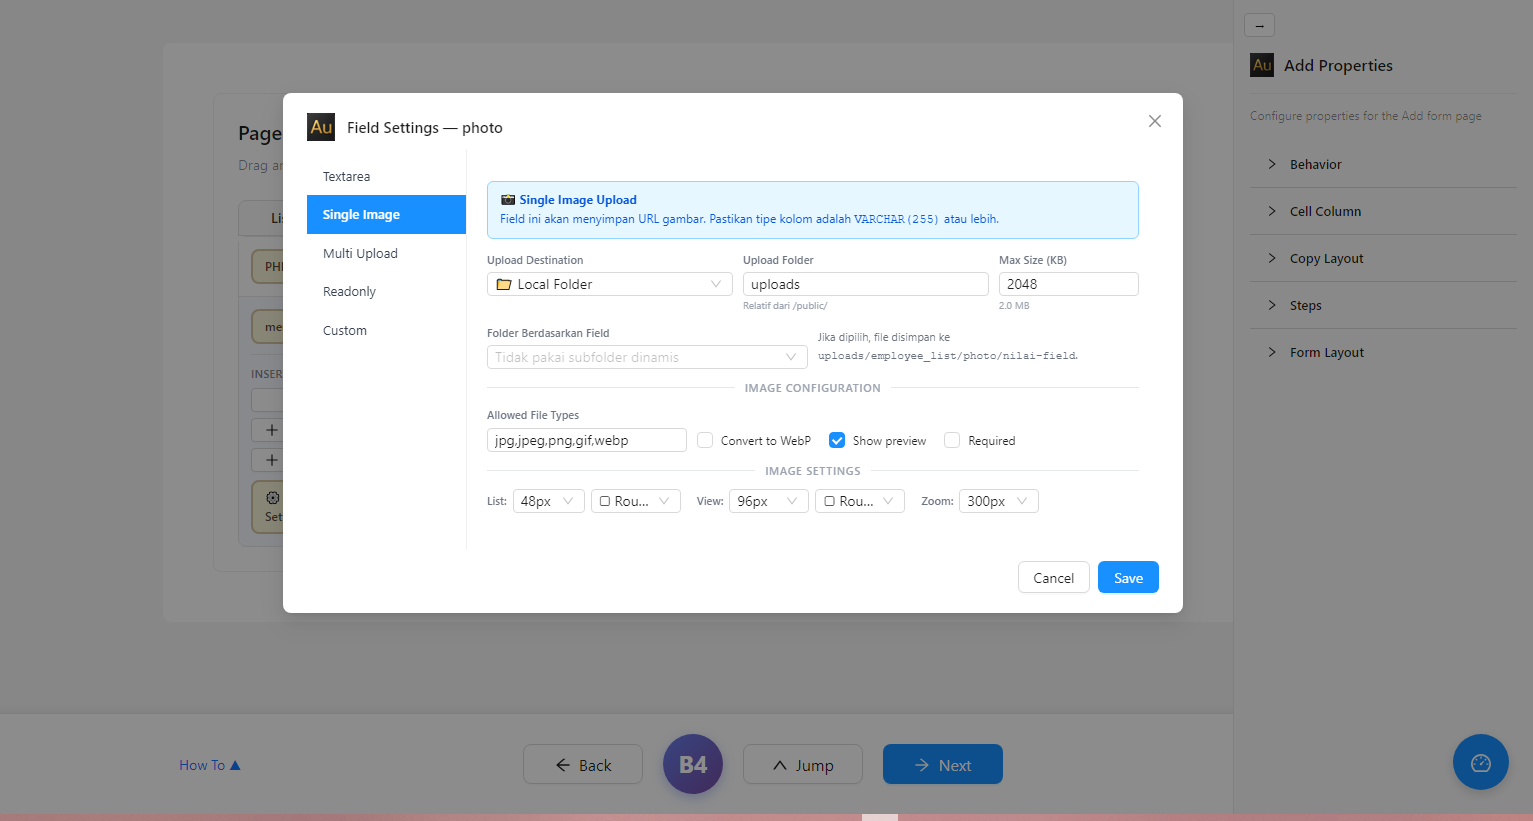
⚠️ The photo field must use text data type. Do not use varchar(255) — it may be too short for some paths.
Configure upload folder, max size (default 2048 KB), allowed file types, and image display sizes for List (48px), View (96px), and Zoom (300px).
Textarea — Address
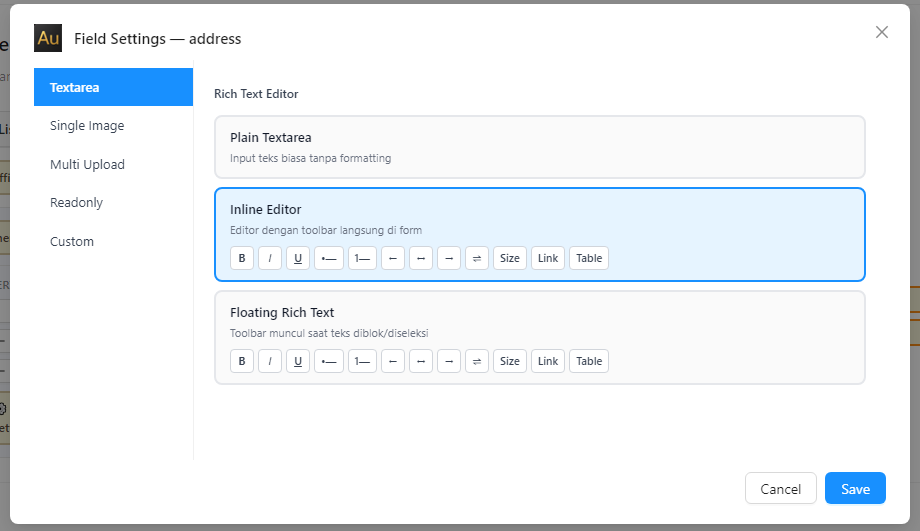
| Editor | Description |
|---|---|
| Plain Textarea | Simple multi-line text — best for addresses and plain notes |
| Inline Editor | Rich text with formatting toolbar always visible |
| Floating Rich Text | Toolbar appears only when text is selected |
Generate Code
Once all tables are configured, you are ready to generate the PHP application.
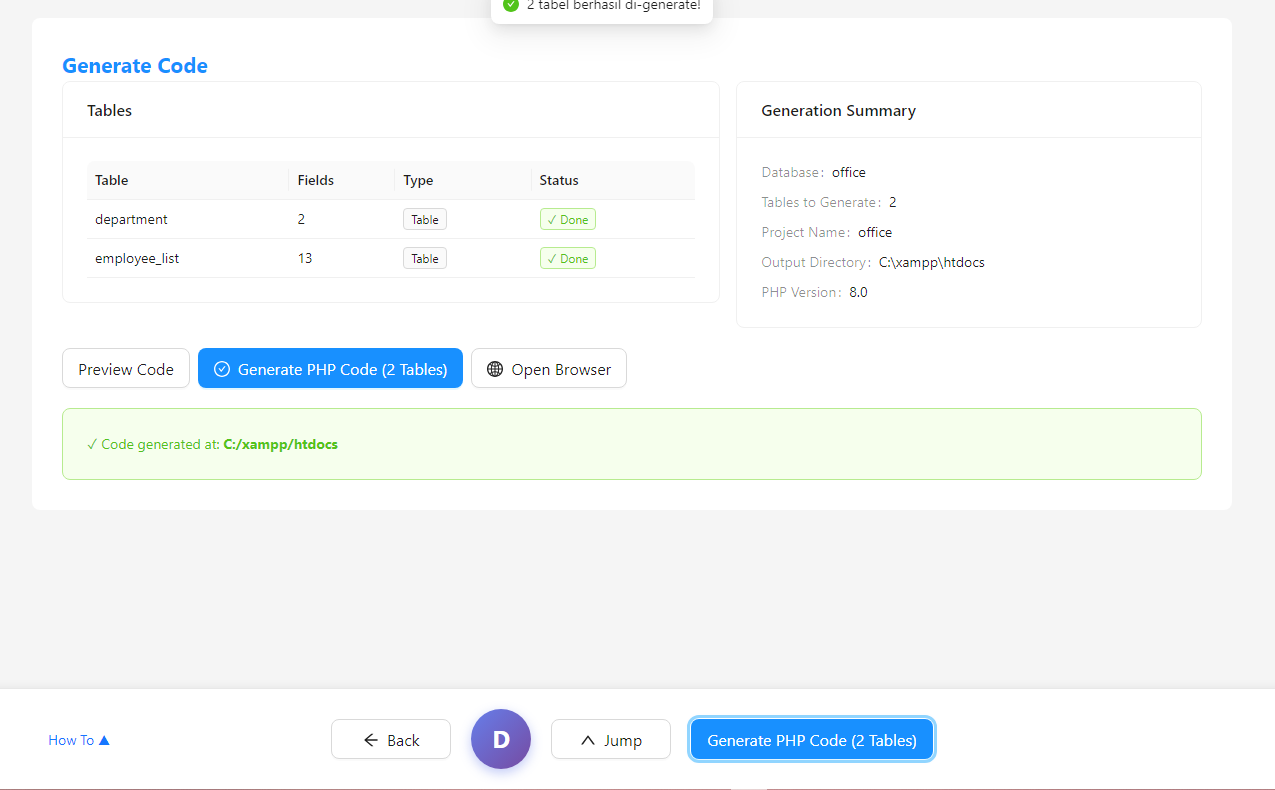
Generation Summary
| Field | Value |
|---|---|
| Database | office |
| Tables to Generate | 2 |
| Project Name | office |
| Output Directory | C:\xampp\htdocs |
| PHP Version | 8.0 |
💡 We strongly recommend setting the Output Directory to your XAMPP htdocs folder — e.g. C:\xampp\htdocs\office. This makes the app immediately accessible in your browser.
Action Buttons
| Button | Description |
|---|---|
| Preview Code | Preview the generated PHP code before saving |
| Generate PHP Code | Creates all PHP files in the Output Directory |
| Open Browser | Opens the generated application in your browser |
Click Generate PHP Code. A success notification appears: "2 tabel berhasil di-generate!" and the confirmation shows: ✓ Code generated at: C:/xampp/htdocs
Click Open Browser — your browser opens to http://localhost/office. Since we selected No Login, the app opens directly without a login screen.
⚠️ Make sure Apache and MySQL are running in XAMPP before clicking Open Browser.
Using the Generated Application
Department List Page
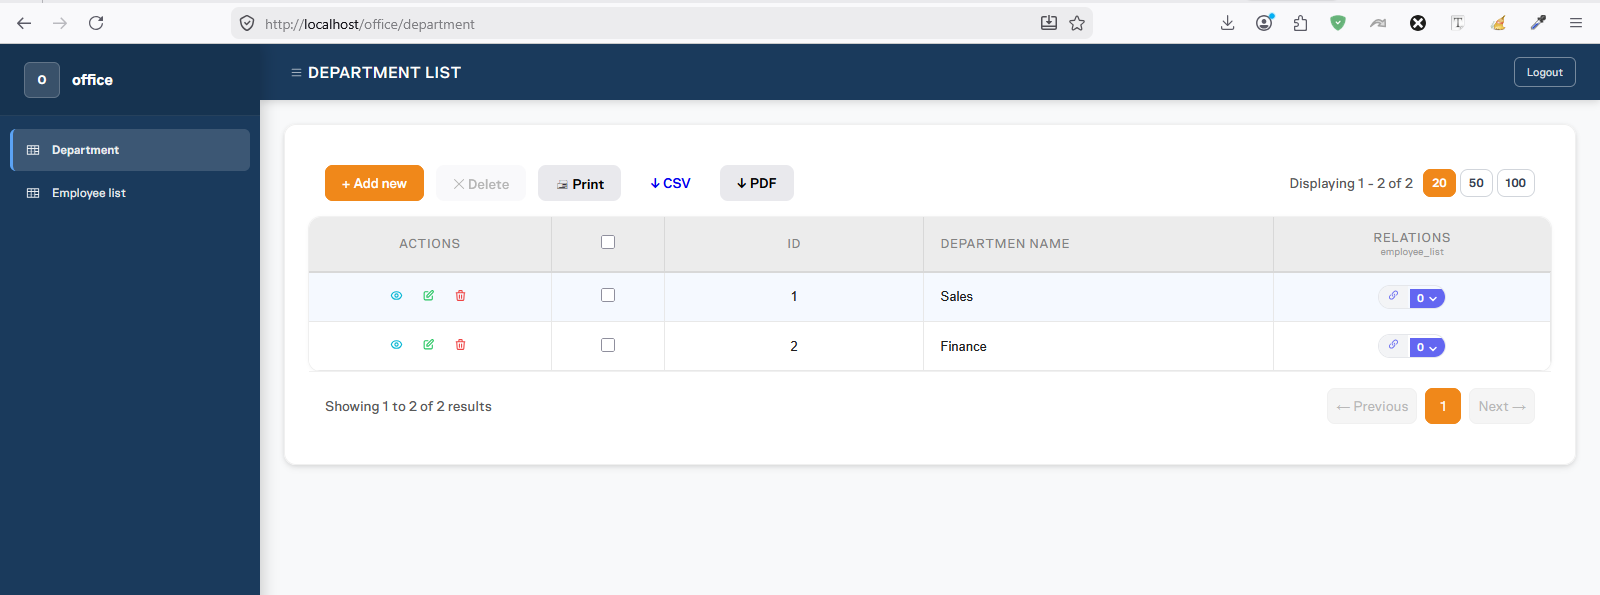
Navigate to the Department menu. The list page includes Add new, Delete, Print, CSV, PDF export, and pagination — all generated automatically.
Add a few department records — e.g. Sales and Finance.
Notice the RELATIONS column on the right with two icons per row:
- 🔗 Chain icon — opens a modal to add employee records linked to this department
- ⬇ Arrow icon with badge — shows the count of linked employees. Click to expand inline
Add Employee — Auto-filled Department

Click the chain icon on the Sales row. The Add employee_list modal opens with the Department field already pre-filled with "Sales" — this is the Table Relation we configured earlier in action.
Fill in the employee details and click Save Employee List. The modal closes and the badge updates immediately.
Inline Preview — Child Records
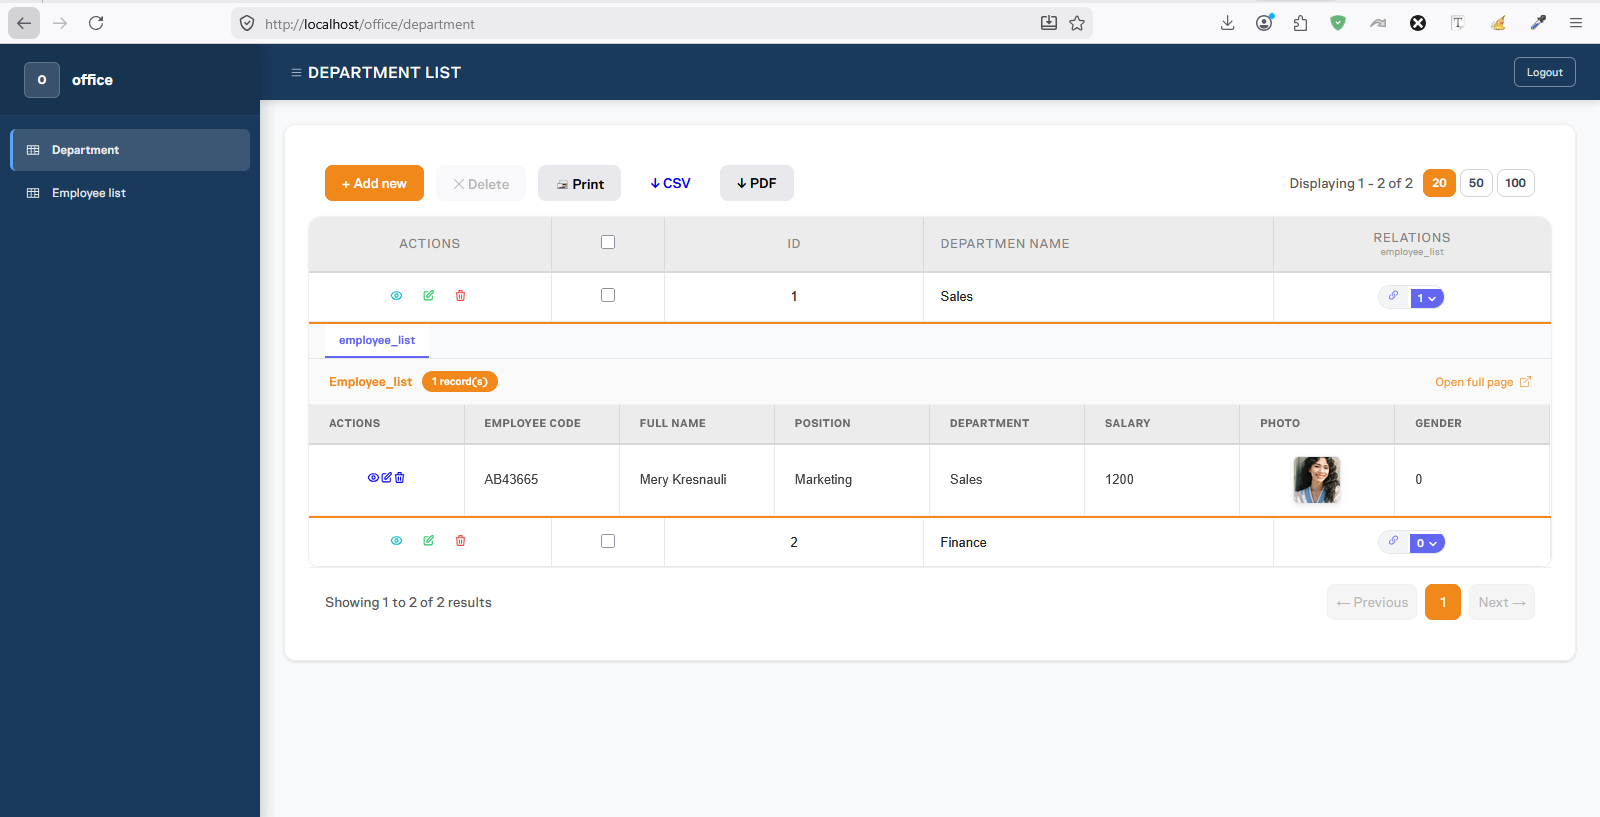
The badge on the Sales row now shows 1. Click the arrow icon to expand — employee records appear inline below the Sales row with a tab showing 1 record(s) and an Open full page link.
Employee List — Group Headers & Modal View
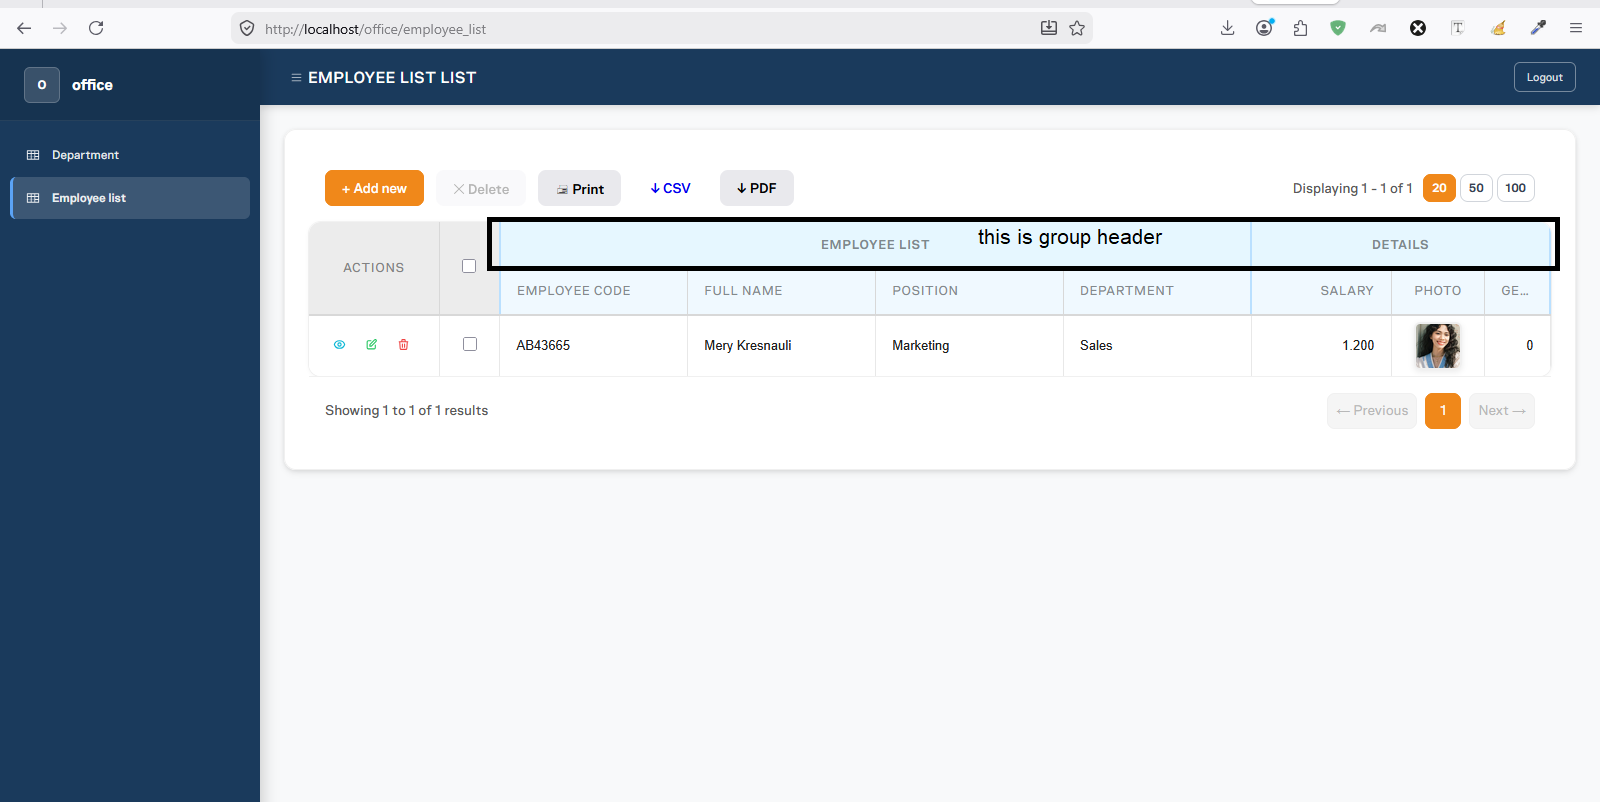
Navigate to Employee list. The table header is divided into two group headers — EMPLOYEE LIST and DETAILS — exactly as configured in Field Grouping.
Click the eye icon (View) on any row — the View record opens as a modal popup with the multi-column layout and friendly field labels we configured in Page Designer.
💡 The group headers, modal behavior, column layout, and currency formatting are all results of the step-by-step configurations in Page Designer and Field Settings — this is everything coming together in the generated application.
Aurum PHP Engine — User Guide v1.0 | https://aurumphp.my.id